继上一篇手写SpringMVC之后《从0开始手写一个 SpringMVC 框架,向高手进阶!》,我最近趁热打铁,研究了一下Mybatis。MyBatis框架的核心功能其实不难,无非就是动态代理和jdbc的操作,难的是写出来可扩展,高内聚,低耦合的规范的代码。
本文完成的Mybatis功能比较简单,代码还有许多需要改进的地方,大家可以结合Mybatis源码去动手完善。
1、Mybatis框架流程简介
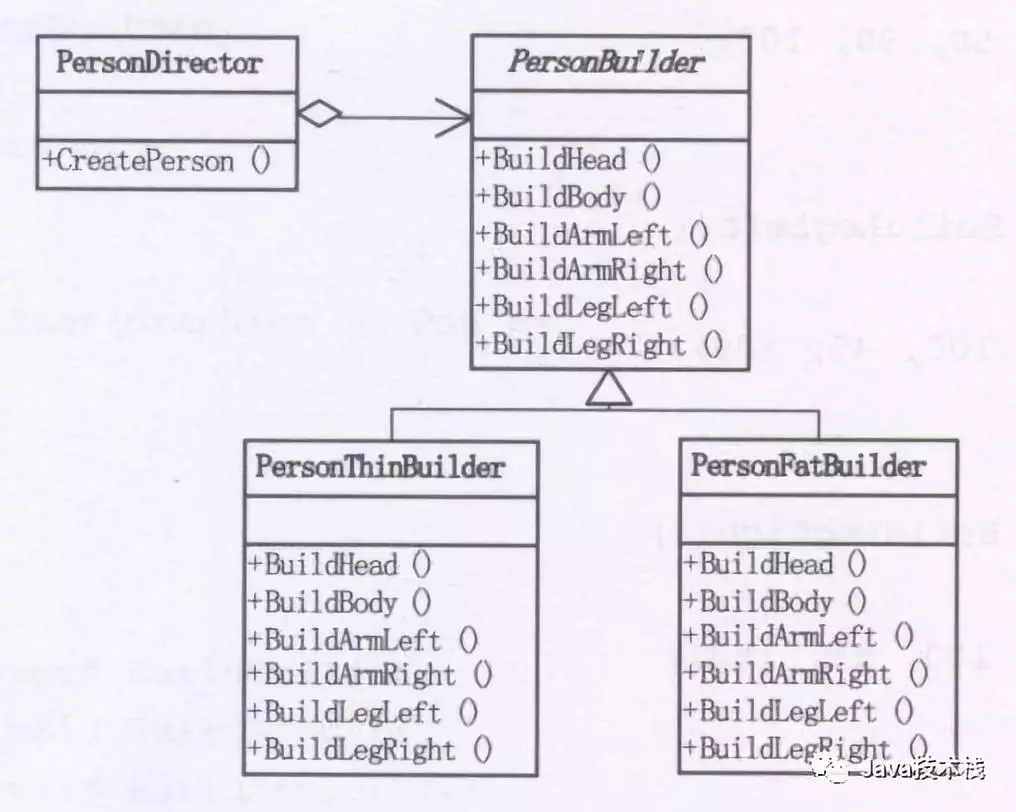
在手写自己的Mybatis框架之前,我们先来了解一下Mybatis,它的源码中使用了大量的设计模式,阅读源码并观察设计模式在其中的应用,才能够更深入的理解源码(ref:Mybatis源码解读-设计模式总结)。
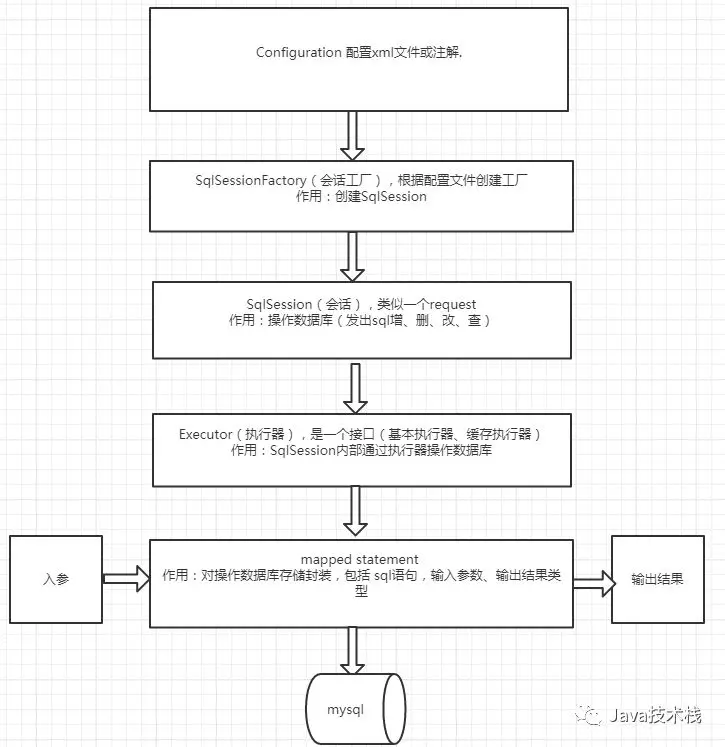
我们对上图进行分析总结:
1、mybatis的配置文件有2类
-
mybatisconfig.xml,配置文件的名称不是固定的,配置了全局的参数的配置,全局只能有一个配置文件。
-
Mapper.xml 配置多个statemement,也就是多个sql,整个mybatis框架中可以有多个Mappe.xml配置文件。
2、通过mybatis配置文件得到SqlSessionFactory
3、通过SqlSessionFactory得到SqlSession,用SqlSession就可以操作数据了。
4、SqlSession通过底层的Executor(执行器),执行器有2类实现:
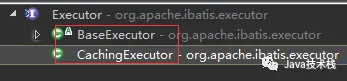
-
基本实现
-
带有缓存功能的实现
5、MappedStatement是通过Mapper.xml中定义statement生成的对象。
6、参数输入执行并输出结果集,无需手动判断参数类型和参数下标位置,且自动将结果集映射为Java对象
-
HashMap,KV格式的数据类型
-
Java的基本数据类型
-
POJO,java的对象
2、梳理自己的Mybatis的设计思路
根据上文Mybatis流程,我简化了下,分为以下步骤:
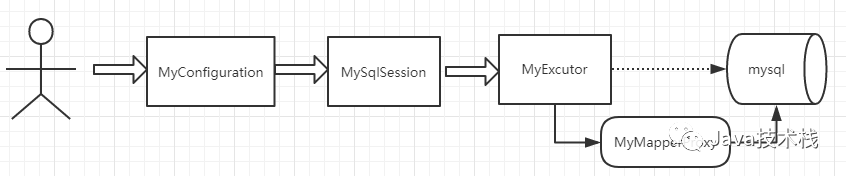
1.读取xml文件,建立连接
从图中可以看出,MyConfiguration负责与人交互。待读取xml后,将属性和连接数据库的操作封装在MyConfiguration对象中供后面的组件调用。本文将使用dom4j来读取xml文件,它具有性能优异和非常方便使用的特点。推荐阅读:Spring Boot 集成 Mybatis 实现双数据源。
2.创建SqlSession,搭建Configuration和Executor之间的桥梁
我们经常在使用框架时看到Session,Session到底是什么呢?一个Session仅拥有一个对应的数据库连接。类似于一个前段请求Request,它可以直接调用exec(SQL)来执行SQL语句。
从流程图中的箭头可以看出,MySqlSession的成员变量中必须得有MyExecutor和MyConfiguration去集中做调配,箭头就像是一种关联关系。我们自己的MySqlSession将有一个getMapper方法,然后使用动态代理生成对象后,就可以做数据库的操作了。推荐阅读:Mybatis传递多个参数的4种方式。
3.创建Executor,封装JDBC操作数据库
Executor是一个执行器,负责SQL语句的生成和查询缓存(缓存还没完成)的维护,也就是jdbc的代码将在这里完成,不过本文只实现了单表,有兴趣的同学可以尝试完成多表。
4.创建MapperProxy,使用动态代理生成Mapper对象
我们只是希望对指定的接口生成一个对象,使得执行它的时候能运行一句sql罢了,而接口无法直接调用方法,所以这里使用动态代理生成对象,在执行时还是回到MySqlSession中调用查询,最终由MyExecutor做JDBC查询。这样设计是为了单一职责,可扩展性更强。推荐阅读:从0 开始手写一个Tomcat,7步搞定!
3、实现自己的Mybatis
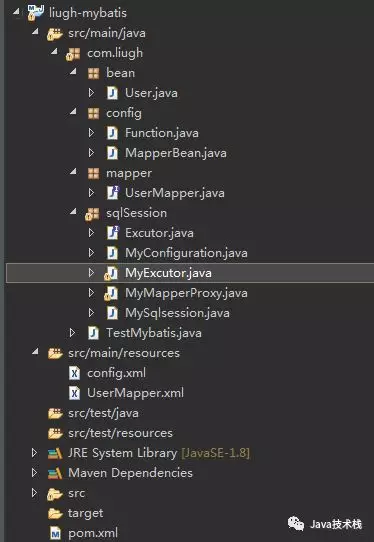
工程文件及目录:
首先,新建一个maven项目,在pom.xml中导入以下依赖:
<project xmlns="http://maven.apache.org/POM/4.0.0" xmlns:xsi="http://www.w3.org/2001/XMLSchema-instance" xsi:schemaLocation="http://maven.apache.org/POM/4.0.0 http://maven.apache.org/xsd/maven-4.0.0.xsd">
 <modelVersion>4.0.0</modelVersion>
 <groupId>com.liugh</groupId>
 <artifactId>liugh-mybatis</artifactId>
 <version>0.0.1-SNAPSHOT</version>
 <packaging>jar</packaging>

 <properties>
   <project.build.sourceEncoding>UTF-8</project.build.sourceEncoding>
   <maven.compiler.source>1.8</maven.compiler.source>
   <maven.compiler.target>1.8</maven.compiler.target>
   <java.version>1.8</java.version>
 </properties>

 <dependencies>
   <!-- 读取xml文件 -->
   <dependency>
     <groupId>dom4j</groupId>
     <artifactId>dom4j</artifactId>
     <version>1.6.1</version>
   </dependency>

   <!-- MySQL -->
   <dependency>
     <groupId>mysql</groupId>
     <artifactId>mysql-connector-java</artifactId>
     <version>5.1.29</version>
   </dependency>
   </dependencies>
</project>
创建我们的数据库xml配置文件:
<?xml version="1.0" encoding="UTF-8"?>
<database>
<property name="driverClassName">com.mysql.jdbc.Driver</property>
<property name="url">jdbc:mysql://localhost:3306/test?useUnicode=true&characterEncoding=utf8</property>
<property name="username">root</property>
<property name="password">123456</property>
</database>
然后在数据库创建test库,执行如下SQL语句:
CREATE TABLE \`user\` (
 `id\` varchar(64) NOT NULL,
 `password\` varchar(255) DEFAULT NULL,
 `username\` varchar(255) DEFAULT NULL,
 PRIMARY KEY (\`id\`)
) ENGINE=InnoDB AUTO_INCREMENT=2 DEFAULT CHARSET=utf8;
INSERT INTO \`test\`.\`user\` (\`id\`, \`password\`, \`username\`) VALUES ('1', '123456', 'liugh');
创建User实体类,和UserMapper接口和对应的xml文件:
package com.liugh.bean;

public class User {
   private String id;
   private String username;
   private String password;
   //省略get set toString方法...
}
package com.liugh.mapper;

import com.liugh.bean.User;

public interface UserMapper {

 public User getUserById(String id);
}
<?xml version="1.0" encoding="UTF-8"?>
<mapper nameSpace="com.liugh.mapper.UserMapper">
   <select id="getUserById" resultType ="com.liugh.bean.User">
       select * from user where id = ?
   </select>
</mapper>
基本操作配置完成,接下来我们开始实现MyConfiguration:
package com.liugh.sqlSession;

import java.io.InputStream;
import java.sql.Connection;
import java.sql.DriverManager;
import java.sql.SQLException;
import java.util.ArrayList;
import java.util.Iterator;
import java.util.List;
import org.dom4j.Document;
import org.dom4j.DocumentException;
import org.dom4j.Element;
import org.dom4j.io.SAXReader;
import com.liugh.config.Function;
import com.liugh.config.MapperBean;

/**
* 读取与解析配置信息,并返回处理后的Environment
*/
public class MyConfiguration {
 private static ClassLoader loader = ClassLoader.getSystemClassLoader();

 /**
  * 读取xml信息并处理
  */
 public  Connection build(String resource){
     try {
         InputStream stream = loader.getResourceAsStream(resource);
     SAXReader reader = new SAXReader();
     Document document = reader.read(stream);
     Element root = document.getRootElement();
     return evalDataSource(root);
   } catch (Exception e) {
     throw new RuntimeException("error occured while evaling xml " \+ resource);
   }
 }

 private  Connection evalDataSource(Element node) throws ClassNotFoundException {
       if (!node.getName().equals("database")) {
         throw new RuntimeException("root should be <database>");
       }
   String driverClassName = null;
   String url = null;
   String username = null;
   String password = null;
   //获取属性节点
   for (Object item : node.elements("property")) {
     Element i = (Element) item;
     String value = getValue(i);
     String name = i.attributeValue("name");
     if (name == null || value == null) {
       throw new RuntimeException("\[database\]: <property> should contain name and value");
     }
     //赋值
     switch (name) {
       case "url" : url = value; break;
       case "username" : username = value; break;
       case "password" : password = value; break;
       case "driverClassName" : driverClassName = value; break;
       default : throw new RuntimeException("\[database\]: <property> unknown name");
     }
   }

    Class.forName(driverClassName);
    Connection connection = null;
   try {
     //建立数据库链接
     connection = DriverManager.getConnection(url, username, password);
   } catch (SQLException e) {
     // TODO Auto-generated catch block
     e.printStackTrace();
   }
   return connection;
 }

 //获取property属性的值,如果有value值,则读取 没有设置value,则读取内容
 private  String getValue(Element node) {
   return node.hasContent() ? node.getText() : node.attributeValue("value");
 }

   @SuppressWarnings("rawtypes")
   public  MapperBean readMapper(String path){
       MapperBean mapper = new MapperBean();
       try{
         InputStream stream = loader.getResourceAsStream(path);
      SAXReader reader = new SAXReader();
      Document document = reader.read(stream);
      Element root = document.getRootElement();
           mapper.setInterfaceName(root.attributeValue("nameSpace").trim()); //把mapper节点的nameSpace值存为接口名
           List<Function\> list = new ArrayList<Function>(); //用来存储方法的List
           for(Iterator rootIter = root.elementIterator();rootIter.hasNext();) {//遍历根节点下所有子节点
               Function fun = new Function();    //用来存储一条方法的信息
               Element e = (Element) rootIter.next();
               String sqltype = e.getName().trim();
               String funcName = e.attributeValue("id").trim();
               String sql = e.getText().trim();
               String resultType = e.attributeValue("resultType").trim();
               fun.setSqltype(sqltype);
               fun.setFuncName(funcName);
               Object newInstance=null;
       try {
         newInstance = Class.forName(resultType).newInstance();
       } catch (InstantiationException e1) {
         e1.printStackTrace();
       } catch (IllegalAccessException e1) {
         e1.printStackTrace();
       } catch (ClassNotFoundException e1) {
         e1.printStackTrace();
       }
               fun.setResultType(newInstance);
               fun.setSql(sql);
               list.add(fun);
           }
           mapper.setList(list);

       } catch (DocumentException e) {
           e.printStackTrace();
       }
       return mapper;
   }
}
用面向对象的思想设计读取xml配置后:
package com.liugh.config;

import java.util.List;
public class MapperBean {

   private String interfaceName; //接口名
   private List<Function> list; //接口下所有方法
   //省略 get  set方法...

}
Function对象包括sql的类型、方法名、sql语句、返回类型和参数类型。
package com.liugh.config;

public class Function {
   private String sqltype;
   private String funcName;
   private String sql;
   private Object resultType;
   private String parameterType;
 //省略 get set方法
}
接下来实现我们的MySqlSession,首先的成员变量里得有Excutor和MyConfiguration,代码的精髓就在getMapper的方法里。
package com.liugh.sqlSession;

import java.lang.reflect.Proxy;

public class MySqlsession {

 private Excutor excutor= new MyExcutor();

 private MyConfiguration myConfiguration = new MyConfiguration();

   public <T> T selectOne(String statement,Object parameter){
       return excutor.query(statement, parameter);
   }

   @SuppressWarnings("unchecked")
   public <T> T getMapper(Class<T> clas){
     //动态代理调用
       return (T)Proxy.newProxyInstance(clas.getClassLoader(),new Class\[\]{clas},
           new MyMapperProxy(myConfiguration,this));
   }

}
紧接着创建Excutor和实现类:
package com.liugh.sqlSession;

public interface Excutor {
 public <T> T query(String statement,Object parameter);
}
MyExcutor中封装了JDBC的操作:
package com.liugh.sqlSession;

import java.sql.Connection;
import java.sql.PreparedStatement;
import java.sql.ResultSet;
import java.sql.SQLException;
import com.liugh.bean.User;

public class MyExcutor implements Excutor{

 private MyConfiguration xmlConfiguration = new MyConfiguration();

  @Override
     public <T> T query(String sql, Object parameter) {
         Connection connection=getConnection();
         ResultSet set =null;
         PreparedStatement pre =null;
         try {
             pre = connection.prepareStatement(sql);
             //设置参数
             pre.setString(1, parameter.toString());
             set = pre.executeQuery();
             User u=new User();
             //遍历结果集
             while(set.next()){
                 u.setId(set.getString(1));
                 u.setUsername(set.getString(2));
                 u.setPassword(set.getString(3));
             }
             return (T) u;
         } catch (SQLException e) {
             e.printStackTrace();
         } finally{
                try{
                    if(set!=null){
                      set.close();
                    }if(pre!=null){
                      pre.close();
                    }if(connection!=null){
                      connection.close();
                    }
                }catch(Exception e2){
                    e2.printStackTrace();
                }
            }
         return null;
     }

     private Connection getConnection() {
         try {
             Connection connection =xmlConfiguration.build("config.xml");
             return connection;
         } catch (Exception e) {
             e.printStackTrace();
         }
         return null;
     }
}
MyMapperProxy代理类完成xml方法和真实方法对应,执行查询:
package com.liugh.sqlSession;

import java.lang.reflect.InvocationHandler;
import java.lang.reflect.Method;
import java.util.List;
import com.liugh.config.Function;
import com.liugh.config.MapperBean;

public class MyMapperProxy implements InvocationHandler{

 private  MySqlsession mySqlsession;

 private MyConfiguration myConfiguration;

   public MyMapperProxy(MyConfiguration myConfiguration,MySqlsession mySqlsession) {
       this.myConfiguration=myConfiguration;
       this.mySqlsession=mySqlsession;
   }

 @Override
 public Object invoke(Object proxy, Method method, Object\[\] args) throws Throwable {
   MapperBean readMapper = myConfiguration.readMapper("UserMapper.xml");
   //是否是xml文件对应的接口
   if(!method.getDeclaringClass().getName().equals(readMapper.getInterfaceName())){
     return null;
   }
   List<Function\> list = readMapper.getList();
   if(null != list || 0 != list.size()){
     for (Function function : list) {
     //id是否和接口方法名一样
      if(method.getName().equals(function.getFuncName())){
               return mySqlsession.selectOne(function.getSql(), String.valueOf(args\[0\]));
           }
     }
   }
      return null;
 }
}
到这里,就完成了自己的Mybatis框架,我们测试一下:
package com.liugh;
import com.liugh.bean.User;
import com.liugh.mapper.UserMapper;
import com.liugh.sqlSession.MySqlsession;
public class TestMybatis {
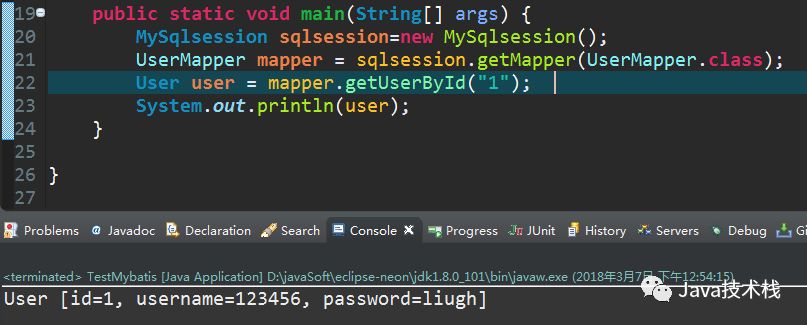
public static void main(String\[\] args) {
MySqlsession sqlsession=new MySqlsession();
UserMapper mapper = sqlsession.getMapper(UserMapper.class);
User user = mapper.getUserById("1");
System.out.println(user);
}
}
执行结果:
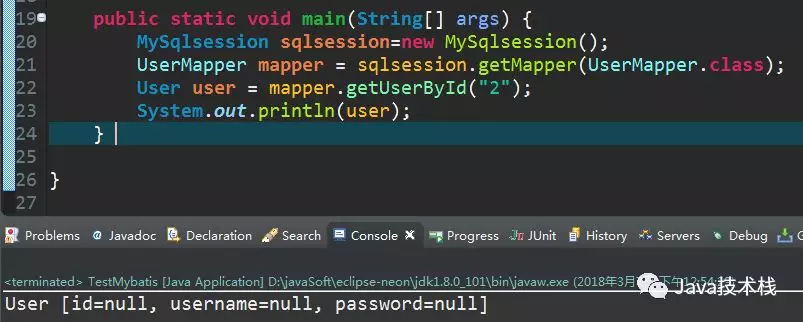
查询一个不存在的用户试试:
到这里我们就大功告成了!
来源:http://my.oschina.net/liughDevelop/blog/1631006
声明:本站所有文章,如无特殊说明或标注,均为本站原创发布。任何个人或组织,在未征得本站同意时,禁止复制、盗用、采集、发布本站内容到任何网站、书籍等各类媒体平台。如若本站内容侵犯了原著者的合法权益,可联系我们进行处理。